Little Ornamental Boxes

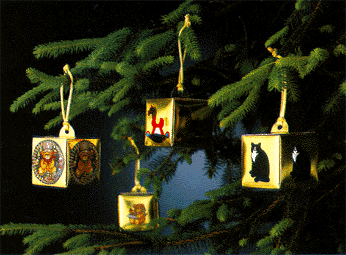
 Shiny little boxes made from coated paper and filled with inexpensive gifts can decorate your tree until they’re given as favors to holiday guests. Or use the boxes on an exciting “Adventure tree” for children: attach stick on numbers to the boxes and hang them on your tree, then open one for each day until christmas.
Look for coated paper (a light weight tag board with colour or foil on one side) in art supply stores. From a 20 by 26 inch sheet you can make four boxes, each about 2 inches on a side. You’ll also need a pencil, ruler, hole punch, compass, art knife, scissors and gold string or cord for hanging the boxes on branch tips.
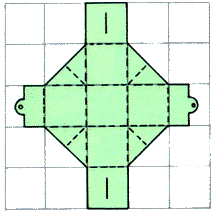
To make the boxes, rule a grid of 2 inch squares on the back side of a sheet of coated paper. Draw the boxes on the grid following the pattern below and using a compass to draw the rounded tabs. Cut out the boxes with an art knife or scissors. Lightly score the fold lines (dotted lines on the pattern) with a shape point. Punch holes in the tabs as shown below; cut 1 inch slits for the tabs where indicated in the pattern. Fold the sides inward to form the box.
To decorate the boxes, use gummed or adhesive stickers (gold stars, numbers, or animal shapes) from a stationary store. Or cut your own designs from adhesive plastic.
After you have filled the boxes with little gifts or candies, simply fold the top pieces closed so the tabs protrude; then add a string for hanging.
Designed By Françoise Kirkman

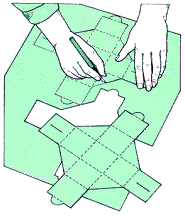
Illustration 1Fig (1)
On the reverse side of a sheet of coated paper, rule a grid of 2 inch squares. Then draw the boxes (use a compass to outline the tabs) and cut them out.

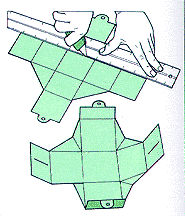
Illustration 2Fig (2)
Lightly score the dotted fold lines using a ruler and a sharp point. Punch holes in the tabs, cut slits to fit the tabs through, and fold to form a box.

Cut out IllustrationFig (3)
Cut-out Illustration. Use this as your template.


Copyright © 1996 THE-NORTH-POLE.COM Designed by LeNewit.com
HOME | ABOUT | PRIVACY POLICY | TERMS OF USE | CONTACT US

